




With the arrival of Update 1.9, Arma Reforger is bringing several new features and underlying system changes that may affect existing mods and custom content. From scripting and editor improvements to magazine repacking, wheeled vehicle simulation, hydration, and AI spawning, this update introduces several changes modders should know about. Below, we’ll go through the most important changes and what you may need to update in your projects.
Script Changes
Version 1.9 brings only a few scripting changes. The most important ones are:
New engine-level Timestamp API. It consists of three classes:
Timestamp– A real wall-clock timestamp with millisecond precision.DateTimeView– An immutable snapshot of a calendar date and time with a time zone offset.Duration– A signed duration with millisecond precision.
These classes can cause naming conflicts in some mods. Update your projects accordingly.
New
Debug.ErrorFormat()method. Instead ofDebug.Error(string.Format(...)), you can now use:
Debug.ErrorFormat("Invalid params %1 < %2", 5, 10, title: "Invalid Params");Character loitering system reworked for better stability in several edge cases.
SCR_ELoiterItemIDis renamed toSCR_EAnimationItemID.Inventory system reworked for better stability:
SCR_InventoryStorageManagerComponent.ValidateStorageRequest()is renamed toValidateItemRequest().SCR_InventoryStorageBaseUI.GetAllItems()is now public. Some mods need to remove theprivatekeyword from their modded classes.
Mission header parsing moved. Parsing moved out of
SCR_GameModeCampaigninto a dedicated method,SCR_BaseGameMode.ParseHeaderFile(notnull MissionHeader missionHeader). This method is called for every game mode that inherits fromSCR_BaseGameModewhen a mission header is present for the session.Wheeled vehicles reworked significantly. The biggest change for existing scripts:
SCR_WheelSlotInfonow has its ownGetWheelIndex()method, so you no longer need custom getters. For more information, see "Wheeled Vehicles" below.SCR_EditableEntityComponentClass.SetAuthor()has a new argument,bool isGM.SCR_EXPRewards.SQUAD_KILL_ASSISTis now available in vanilla.WorldEditorAPI methods removed:
ModifyHeightMap,ModifyHeightMapUserShape,ModifyLayers,ModifyLayersUserShape.
ElideText()moved fromRichTextWidgettoTextWidget, so more lightweight elements can use it.DbgUI.Separatoradded. It draws a thin horizontal line across the full window width to help you organize the UI.
Editor Changes
Log Console: Text Selection and Copying
Several quality-of-life fixes improve how you select and copy text:
Selection is more accurate, so it's easier to select what you want.
Double-click selects a whole word, as in most text editors.
Copying selected text is now reliable.
The confusing dashed rectangle that appeared after a double-click - and looked like a selection - is gone.
Animation Editor: Graph Window Navigation History
The graph view now keeps a location history, so you can jump backward and forward through positions you've already visited instead of manually retracing your steps.
Navigate by using the toolbar buttons or the keyboard shortcuts Alt+Left and Alt+Right.
A location is recorded automatically whenever the active sheet changes or the selection moves to a different node.
The history is scoped to the current workspace session and is cleared when you close the workspace.
World Editor
When a config object is inherited from another config file, that information is now visible in child configs and prefabs as well. Inherited config objects appear dimmed.
Script Editor
When nothing is selected, Ctrl+C and Ctrl+X copy or cut the entire line.
The biggest changes in 1.9 are new features, and some of them require mods to adapt.
Magazine Repacking
Magazine repacking is a quality-of-life feature for infantry gameplay. Players can combine partially loaded magazines by dragging one onto another, which extends sustained fire and reduces the need to reload constantly. After a firefight, a player often ends up with several magazines that hold only a few rounds each. Repacking turns those into fewer, fuller magazines, and players can discard the empties to save weight.
Repacking is server-authoritative. The client requests it, the server validates it and transfers rounds one at a time, and the server replicates progress to nearby proxies so that everyone in earshot hears the repacking sound.
Behavior and Constraints
Rounds transfer one at a time. The transfer time per round is the source magazine's extraction time plus the target magazine's insertion time.
Both magazines are locked for the duration, so they can't be moved or transferred.
Players can't repack a magazine that's attached to a weapon.
The character must stay still while repacking, unless they're in a vehicle.
Repacking is interrupted by changing stance, raising the weapon, or using a gadget. In a vehicle, it's also interrupted by changing seats or aiming.
Closing the inventory stops the process.
Magazines can be deleted when empty after repacking finishes (Delete if empty,
trueby default).Repacking finishes when the source magazine runs out of rounds or the target magazine is full.
Repacking Rules
A repacking rule determines which magazine can reload which. The system builds a set of all bullet types in the game, and each magazine declares the bullet types it contains in its component prefab data.
CAN_WHEN_OTHER_CONTAINS_THIS_AMMO_TYPES : Default. The source magazine must contain all bullet types present in the target magazine. For example, if the target holds M855 ball mixed with M856 tracer, the source must hold at least those two types. Because the requirement is "at least," a source that also holds M995 AP is still accepted.
CAN_WITH_SAME_AMMO_COMPOSITION : The source magazine must have exactly the same composition of bullet types as the target. As with the default rule, only the types matter, not the ratio between them.
CAN_WITH_SAME_AMMO_CONFIG : Checks only that both magazines use the same ammo config. A source that uses the same config but different types can still load, and its rounds convert into the projectiles that the target magazine uses.
CAN_WITH_SAME_CALIBER : Allows repacking between magazines of the same caliber.
CAN_WITH_SAME_MAGAZINE : Allows repacking only when the source magazine is the same prefab as the target.
CANNOT : The magazine can't be repacked.
Override the Rules
You can set the rule at three levels. Priority runs mission header > game mode > magazine prefab:
Magazine prefab – The rule configured in
SCR_MagazineComponentis the baseline.Game mode – The
m_eMagazineRepackingRulesOverrideattribute on the game mode entity overrides the prefab rule.Mission header or server config –
m_sMagazineRepackingRulesOverridein the mission header overrides both, and you can set it from the server config file.
Accepted values for m_sMagazineRepackingRulesOverride are NO_OVERRIDE (the default, which uses whatever the magazines and game mode define) and any rule name from the preceding table.
Set up Repacking
Most of this feature lives in configs, so adapting a mod is mostly a matter of drag and drop. You need to set up both the system and the individual magazines.
System
{86E953538A28A98D}Configs/Systems/ChimeraSystemsConfig.confneeds an enabled instance ofSCR_MagazineRepackingSystem.{DAA31F8A78F30455}Configs/Weapons/Ammo/AmmoList.confneeds a list of all projectile prefabs used by magazines that you want to be repackable.
Magazines
To make a magazine compatible:
For the magazines that are meant to be carried in the hand (e.g. in vanilla large magazines like ones for M249, PKM, NSV, etc):
Add the component from
{C83ECE834B026D12}Prefabs/Weapons/Core/Configs/CarryableMagazineGadgetComponent.ctto the prefabIn the prefab's
InventoryMagazineComponent:Apply
{3AE89750062A7430}Prefabs/Weapons/Core/Configs/CarryableMagazinItemAnimationAttributes.confto ItemAnimationAttributesApply
{122E4DB95EF2FB21}Prefabs/Weapons/Core/Configs/CarrableMagazineCharacterModifierAttributes.confto CharacterModifierAttributes
For all the magazines (including those from the previous steps):
Change
MagazineComponenttoSCR_MagazineComponent- it carries the logic and attributes for repacking - and configure:m_iRoundLoadingTime- round insertion timem_iRoundExtractingTime- round extraction timeDelete if empty (true by default)
Repacking rule (
CAN_WHEN_OTHER_CONTAINS_THIS_AMMO_TYPESby default)
WARNING: Some mods already implement their own repacking functionality. Check your mods' dependencies and server setups to avoid conflicts between vanilla and modded repacking.
Wheeled Vehicles
Wheeled vehicle simulation has changed substantially in 1.9. The entire powertrain simulation - engine, clutch, differentials, and wheels - is rewritten from scratch while remaining backward compatible with the previous implementation. This section describes what changed from a modding perspective and how to migrate an existing vehicle to the new steering system.
Wheeled Vehicle Simulation
Engine
Coupled Inertia is removed. The engine now calculates it dynamically.
To simplify engine configuration, use Braking Torque Ratio. The game uses it when Friction (engine braking torque) is
0.Engine Inertia (moment of inertia) is calculated automatically when its value is
0.
Clutch
The clutch is simulated as a friction disc against the engine, and Max Clutch Torque is the maximum friction torque between the clutch and the engine.
This value must be larger than the engine's peak torque. Otherwise, the clutch can't transfer the engine's torque. Higher values let the engine match drivetrain RPM faster, which can cause sudden jumps in engine RPM - and in engine sound.
Steering
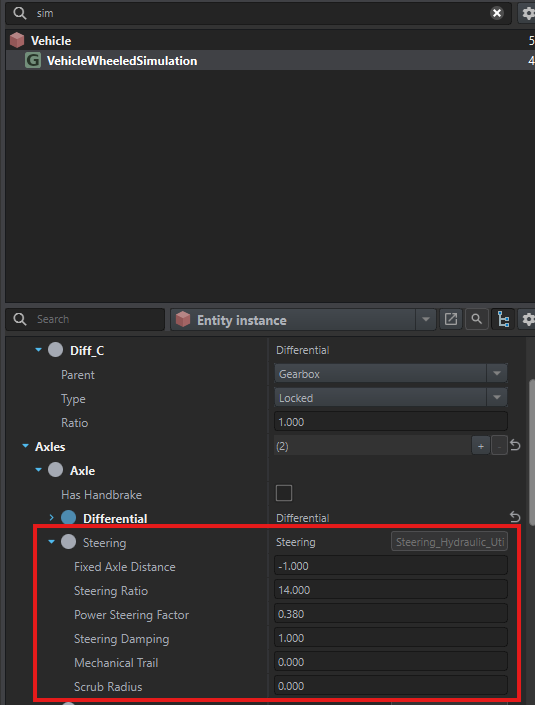
To use the new steering features - Ackermann steering, force feedback, and steering torque - create a Steering class on the steering axles.
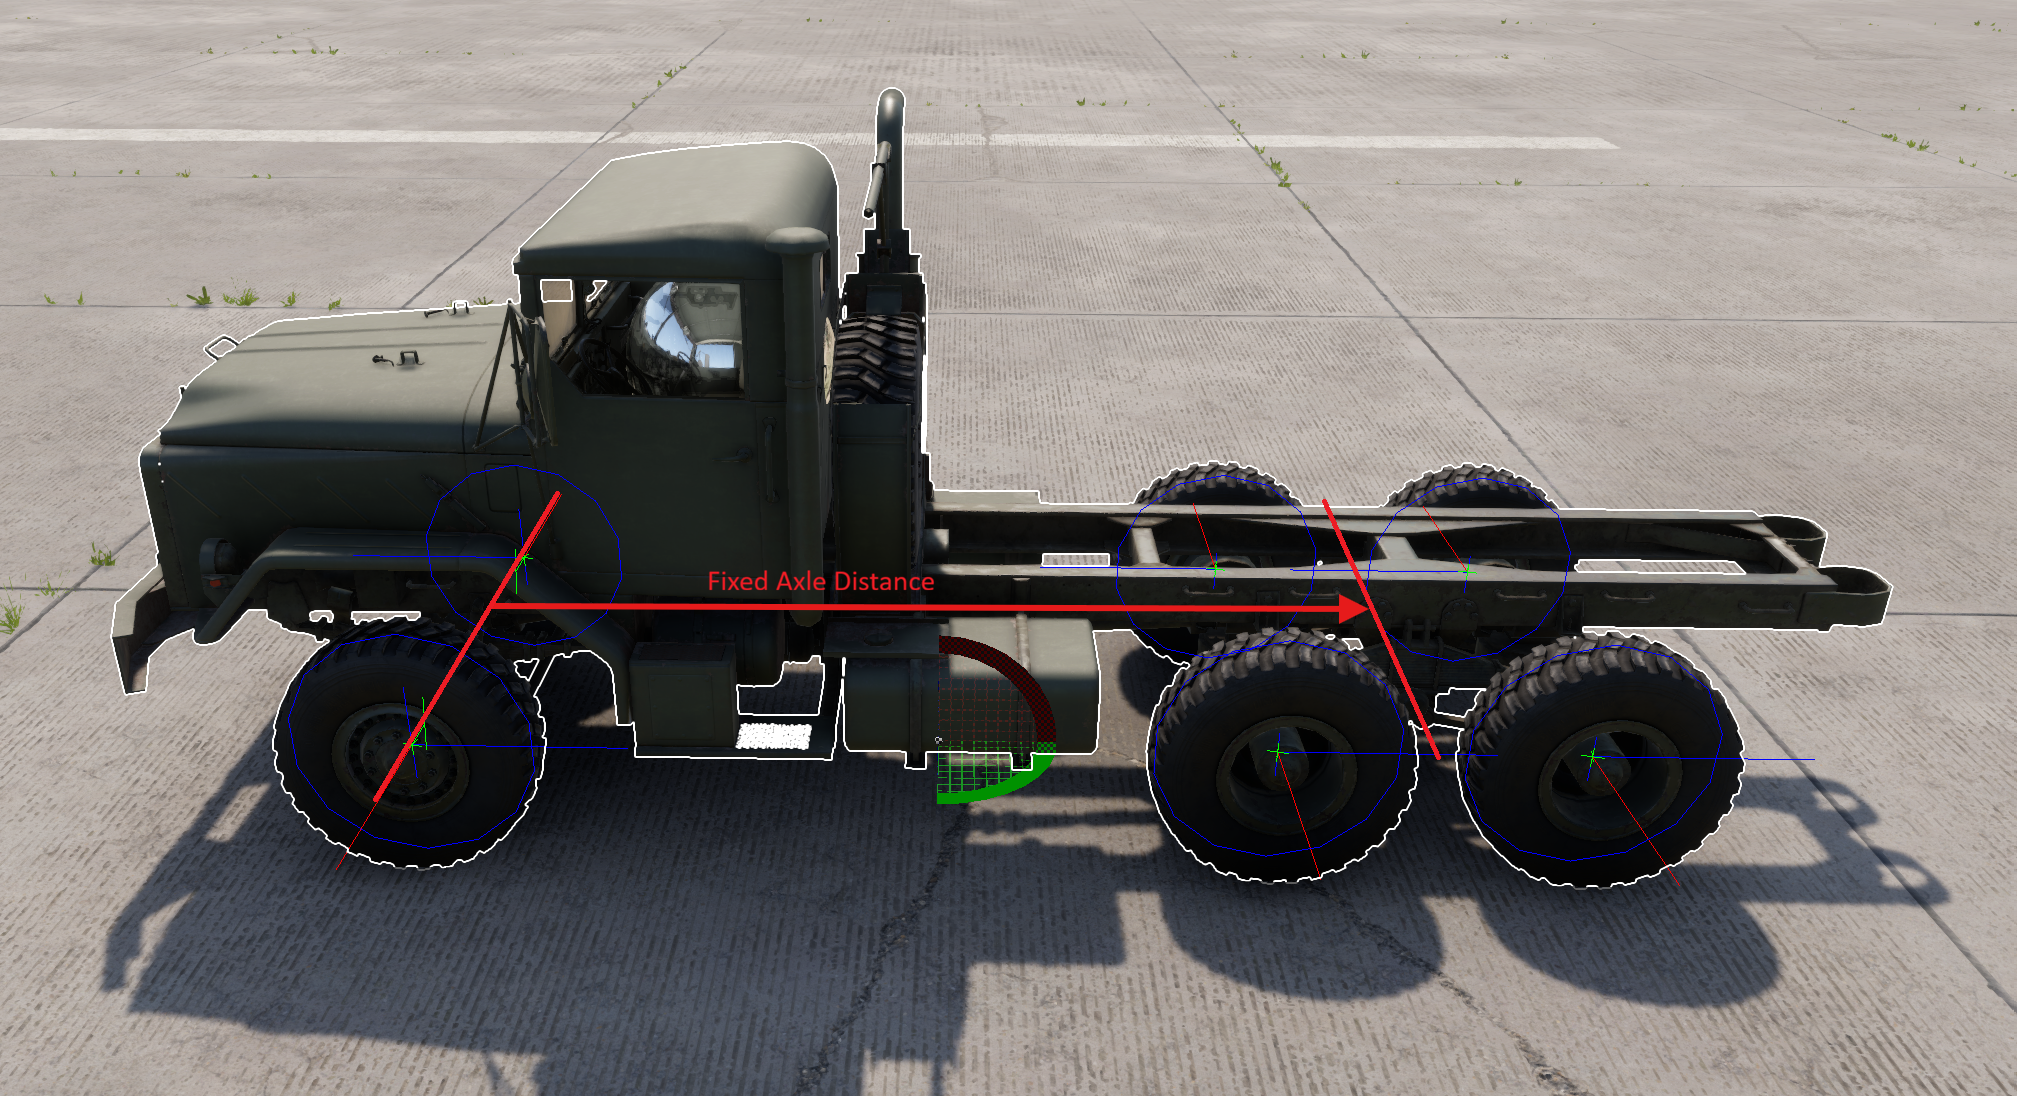
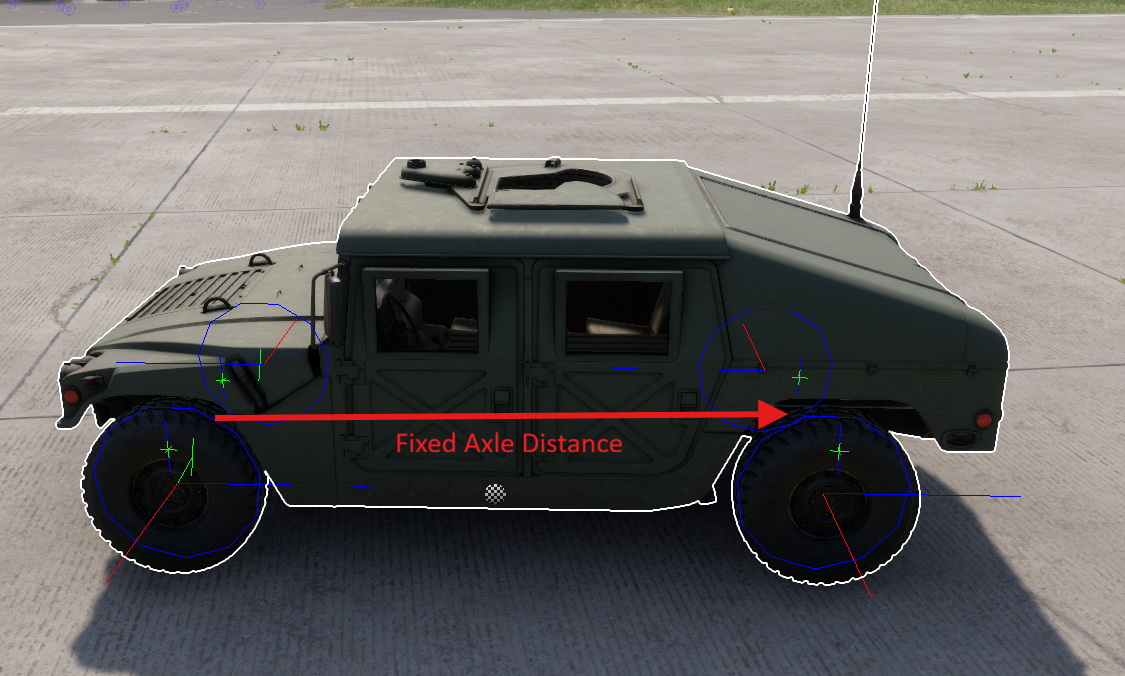
Fixed Axle Distance – The distance between the steering axle and the fixed axle. For vehicles with more than one fixed axle, use roughly the average of the two axles. A negative value is computed automatically. A value of
0disables Ackermann steering.Steering Ratio – The ratio of steering wheel rotation to road wheel rotation. A higher ratio means less steering torque.
Power Steering Factor – Determines how much road wheel steering torque the steering wheel transmits:
steeringTorque = (1 - powerSteeringFactor) * wheelTorque.Mechanical Trail – Determines how much steering torque the lateral friction force (Fy) on the tire creates - that is, the moment arm - in the right wheel's coordinate frame. It overrides automatic computation by kingpin. Use
0when the kingpin axis is defined correctly.Scrub Radius – Determines how much steering torque the longitudinal friction force (Fx) on the tire creates - that is, the moment arm - in the right wheel's coordinate frame. It overrides automatic computation by kingpin. Use
0when the kingpin axis is defined correctly.
Set up Inter-axle Differentials
Inter-axle differentials (IADs) distribute torque between the axle differentials. Without an IAD, all axle differentials connect directly to the gearbox, and gearbox torque is distributed evenly between them. As a result, an axle that loses contact with the ground wastes its share of the gearbox torque. The former Torque Share parameter is removed.
To set up IADs:
Define a central differential parented to the gearbox.
Define more differentials based on how many drive axles you have. As a rule, n drive axles need n-1 IADs.
Parent the axle differentials to the IADs, and parent the IADs to each other.
Give each differential exactly two children. Any other configuration is invalid.
You can lock and unlock a differential - or use a limited-slip differential (LSD) - from script through VehicleWheeledSimulation::UpdateIADConfiguration by updating the differential's strength:
VehicleWheeledSimulation sim = VehicleWheeledSimulation.Cast(veh.FindComponent(VehicleWheeledSimulation));
map<string, float> cfg = new map<string, float>();
cfg.Set("Strength", 1); // locked diff
// update the IAD
sim.UpdateIADConfiguration(cfg, 0);
NOTE: Vanilla Arma Reforger doesn't expose manual differential locking to players. All vanilla IADs are either permanently locked or simulated in LSD mode. The preceding scripting API is available to modders and scenario designers.
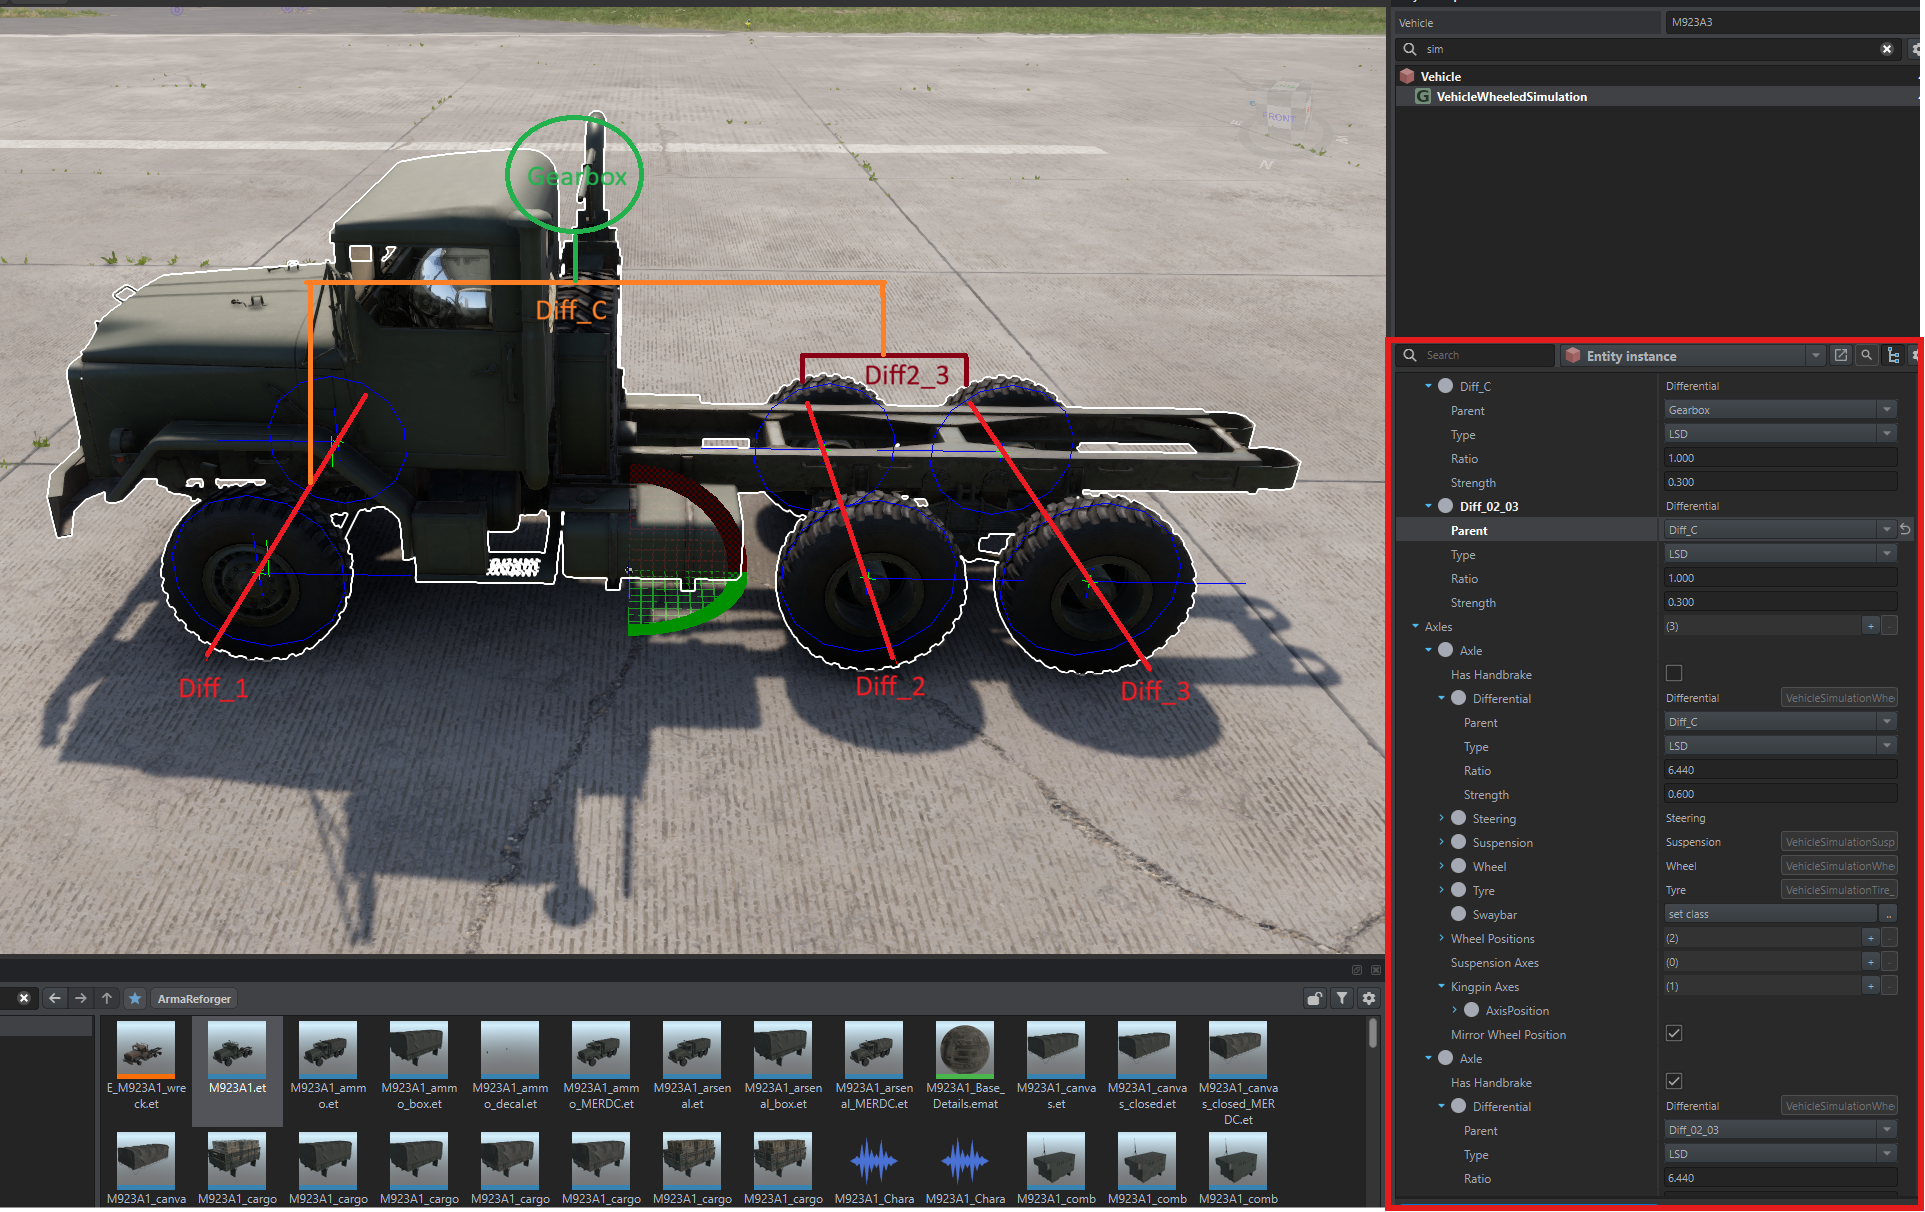
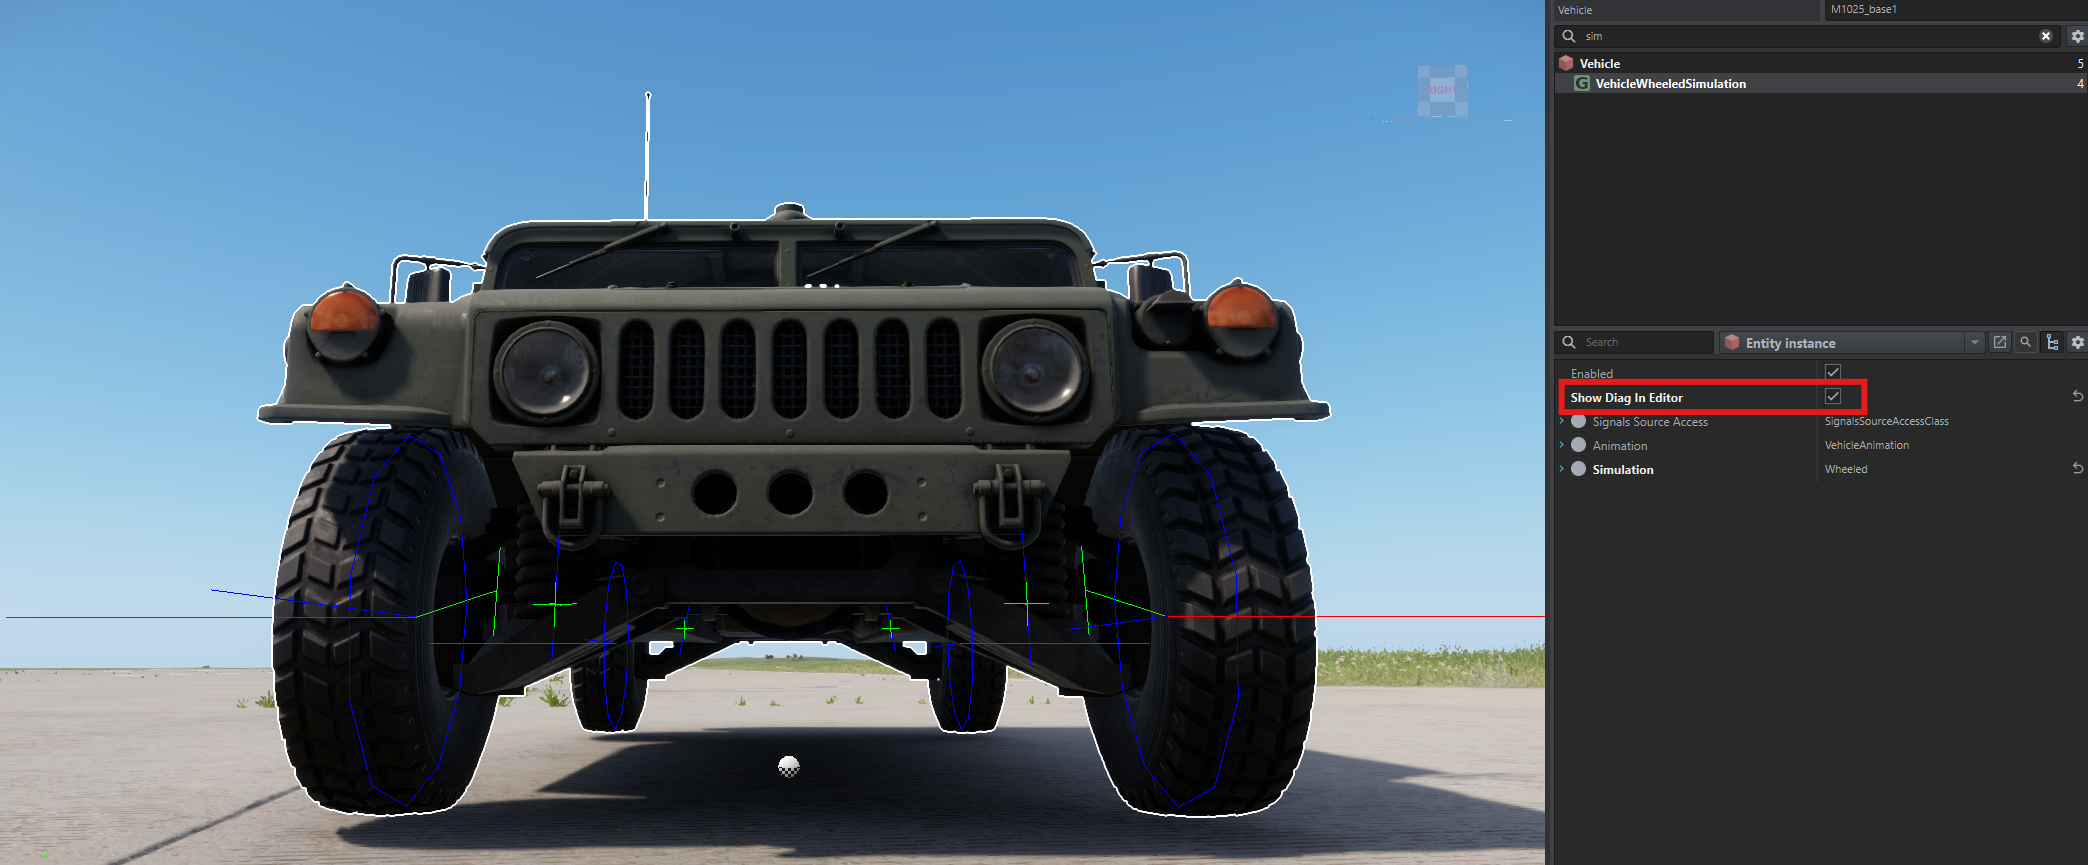
Show Diag Shapes in the Editor
To see how your changes affect the simulation, use the Show diag shapes prefab option in the VehicleWheeledSimulation component. It displays the wheel, suspension, and kingpin axes.
Animation Compared with Simulation
The simulation and the animation are independent of each other. If you use a bone for the wheel axis, for example, that bone is used only statically during simulation setup; the animation doesn't update its position in the simulation. The reverse is true: the simulation updates the animation through signals.
For this reason, use diag shapes to confirm that every axis and component is placed correctly to match the animation.
Kingpin Axis
The kingpin axis, also known as the steering axis, is the axis that the wheel rotates around during steering. The axis position is used only as the rotation center. The Y axis is the rotation axis, and it must point upward in model space. You can incline it slightly to create caster and steering axis inclination (SAI).
If the axis is undefined, axis Y matches model Y and the game uses Wheel Position instead, which is backward compatible with the previous behavior. The kingpin axis is also used to calculate Mechanical Trail and Scrub Radius for the wheel when the Steering class data doesn't define them.
You only need to create an axis for the left wheel; the game mirrors it automatically for the right wheel. You can still define both manually.
In the diag view, the kingpin appears in green.
The key parameters of the steering axis are caster and SAI:
Viewed from the side, the bottom of the steering axis typically points toward the front and the top points toward the back (positive caster). Typical caster is 3–6 degrees positive.
Viewed from the front or back, the top of the steering axis must point toward the driver (center) and the bottom away from the driver (positive SAI).
Suspension Axis
Use the suspension axis to define how the suspension travels. The position is the initial spring position, without upward or downward travel. The Y axis is the travel axis, and it must point upward in model space.
If the axis is undefined, axis Y matches model Y and the game uses Wheel Position instead, which is backward compatible with the previous behavior.
You only need to create an axis for the left wheel; the game mirrors it automatically for the right wheel. You can still define both manually.
Wheel Position
You can rotate the wheel hub to create camber and toe. Only the wheel's X axis is used, and it can't deviate more than 60 degrees from the model X axis.
Use the Mirror Wheel Position parameter to mirror the left wheel and obtain the right wheel position automatically, as with the kingpin axis and the suspension axis.
ABS Braking
To enable ABS braking on the wheels, use the ABS Slip Threshold parameter in the Wheel class:
A value of
1lets the wheels lock completely and slip. This is the default behavior.For ABS braking, use a value greater than
0and less than1. We recommend 0.1–0.15.
The ABS Minimum RPM parameter defines the minimum RPM that uses ABS braking. Lower RPMs use full braking and can lock the wheels.
Vanilla vehicles don't use ABS in 1.9, but the feature is fully available to the modding community.
Tire Tread
The Tire class now uses the Tread parameter. It's a scalar value between 0 and 1 that interpolates between the surface's tread and non-tread friction coefficients.
Tire Model
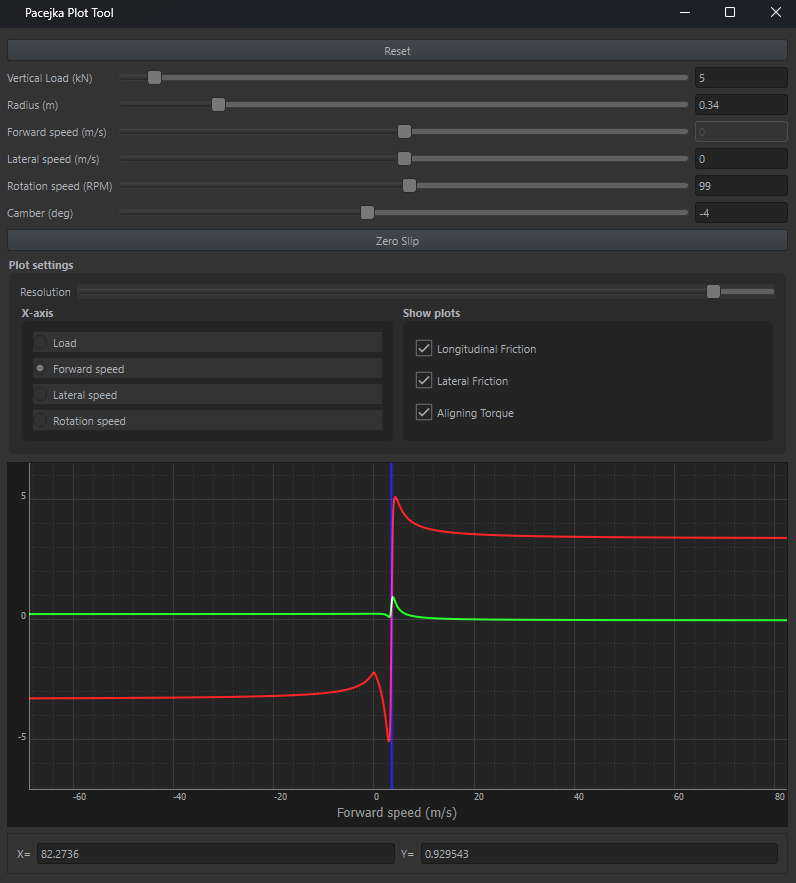
You can now configure the tire model (Pacejka) by using prefabs. We currently support the Pacejka 2002 (MF 5.2) and Pacejka 94 tire models. If you don't define a tire model, the game uses a Pacejka 2002 model with default parameters.
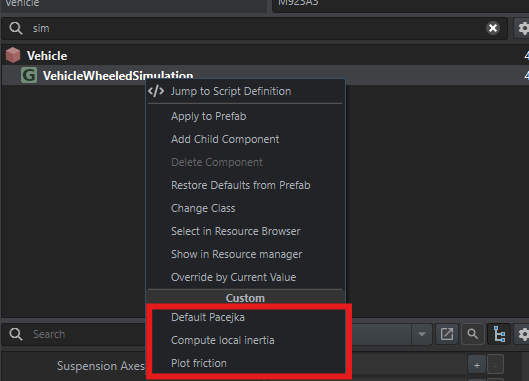
To fill the tire model with default parameters for the active entity or prefab, right-click the
VehicleWheeledSimulationcomponent and select Default Pacejka.To verify the Pacejka model, right-click the
VehicleWheeledSimulationcomponent and select Plot Friction to open the Pacejka plot tool for the active entity or prefab.
Confirm that the tire model performs correctly under its intended operating conditions. For example, if a heavy vehicle uses the tire, adjust Load to match the target load.
NOTE: In the standard Pacejka 2002 formula, the PDY3 parameter is used in the form 1 / (1 + PDY3 * gamma * gamma). We use the expanded series form, (1 - PDY3 * gamma * gamma), which assumes small camber and PDY3 values.
Migrate an Existing Vehicle to the New Steering System
Follow these steps to bring an existing vehicle prefab over to the 1.9 steering system.
Step 1: Reset Mechanical Trail and Scrub Radius
If you don't know these values from real-world data, set both Mechanical Trail and Scrub Radius to 0 in VehicleWheeledSimulation > Axles > Axle > Steering. A value of 0 makes the game use the kingpin axis that you define later.
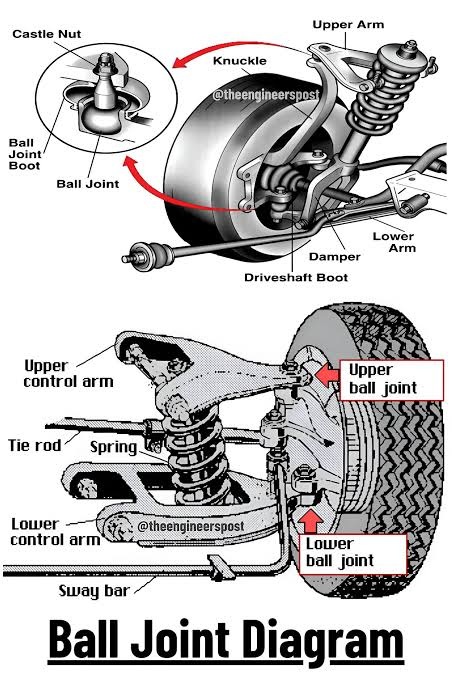
Step 2: Identify the Steering Joints
Identify the steering joints, as shown in the following image. The lower joint is usually enough, but a typical road vehicle has two: lower and upper.
Step 3: Define the Kingpin Axis
The joints give you the kingpin axis, as shown in the following image. Set it up so that the lower steering joints sit slightly farther apart than the upper steering joints - in other words, the lower end of the axis points outward by a few degrees. It must never point inward.
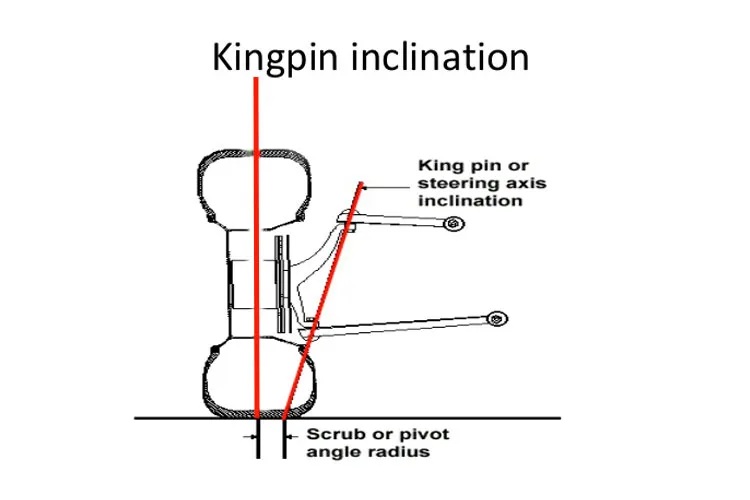
Scroll to the Kingpin Axis entry, add an array, and move the kingpin axis to the steering axles that you identified earlier.
In almost all cases, the kingpin axis is the actual steering axis. Vanilla models use the wheel_rotator bone, because it already matches the correct axis. That isn't guaranteed for every model, so verify your setup: turn on vehicle debug in the editor by selecting the Show diag shapes checkbox at the top of the VehicleWheeledSimulation class.
Step 4: Add Caster to the Wheels
After you define the kingpin axis, add caster to the wheels. The caster angle describes how many degrees the steering axis is tilted in front of the wheel center, as shown in the following image.
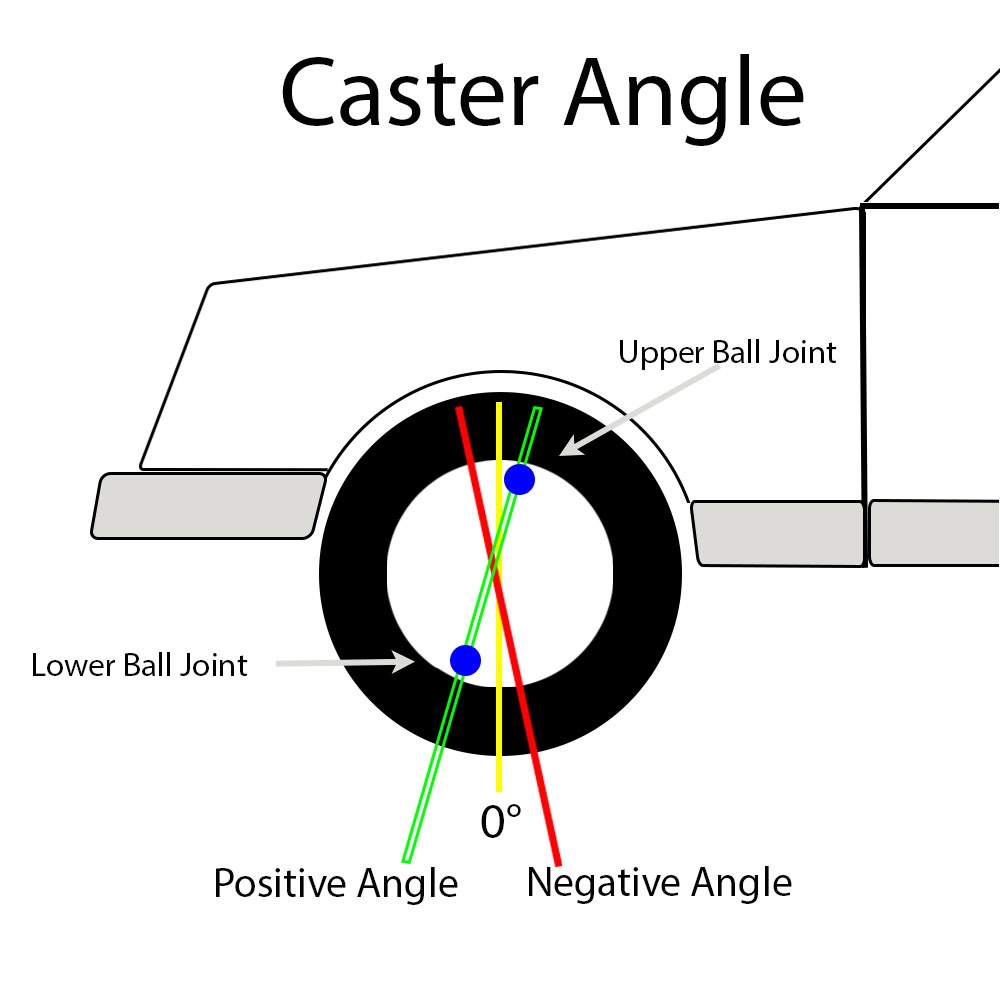
The real caster value of a vehicle is often hard to determine, but 4–6° of positive caster is normal even without data. Negative caster is highly unusual and is mostly used for trailing steering, such as on combine harvesters.
Positive caster works because the wheel always trails behind the steering point. That's also why motorbikes self-center: the wheel chases the steering and counters it, so it always returns to a 0° steering angle.
Step 5: Set Toe and Camber
Finally, set the wheel's toe and camber in the Wheel Position setup. The X axis must face outward. Set up one wheel only, and then use Mirror Wheel Position to apply the same, inverted setup to the other wheel.
Keep these values small. The Trabant 601 (T601), for example, uses 1° of camber and 0.2° of toe-in. In nearly all cases, the correct values fall in the 0.1–1.5° range. Larger values put you in racing-setup territory, where handling becomes noticeably more aggressive and, on a real car, tire wear increases sharply. Rally cars, for example, often run toe-out on the front wheels for sharper turn-in and toe-in on the rear wheels for stability.
Car Controller Component
Steering
Steering curves are removed. All vehicles now steer naturally, based on their simulation properties such as steering axle distances.
The Maximum Steering Speed parameter limits the highest possible steering speed. It applies to all input devices, which removes the advantage that analog controllers previously had from steering instantly.
Simplified Gear Shifting
All gear-shifting parameters, such as upshift and downshift factors, are removed. The game now detects them automatically from the simulation.
 (1).png)
VehicleWheelEffectComponent
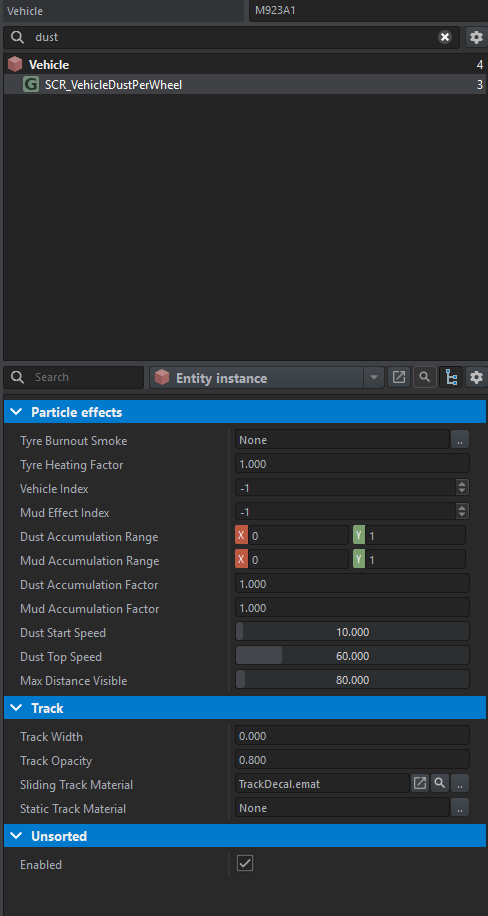
The SCR_DustPerWheel implementation has moved from script to game code; its performance is improved, and it now supports new wheel-related features such as skid marks, burnout smoke, and dust and mud on the vehicle. SCR_DustPerWheel now inherits from VehicleWheelEffectComponent.
Burnout Effect
The burnout effect appears when the wheel surface temperature exceeds 150 °C. It grows from there and reaches maximum size and density at 300 °C.
Skid Marks
You can use both sliding tire effects and static tire effects - the latter apply when the vehicle isn't sliding but is moving across soft surfaces such as dust and mud. We don't recommend static effects, because they can cause performance problems on lower-end platforms.
Dust and Mud
Vehicles accumulate dust and mud as they move through the environment, and rain or water can clean them. With the scripted API, you can add other ways for a vehicle to get dirty or clean. You can also adjust the dirtiness and muddiness ranges and accumulation factors to limit how dirty a vehicle gets and how fast.
Dust and mud accumulation reaches its maximum value after a vehicle moves for 10 seconds in a fully dirty environment (dustiness or muddiness = 1). Time increments according to this formula: dirtiness * accumulation * timeStep.
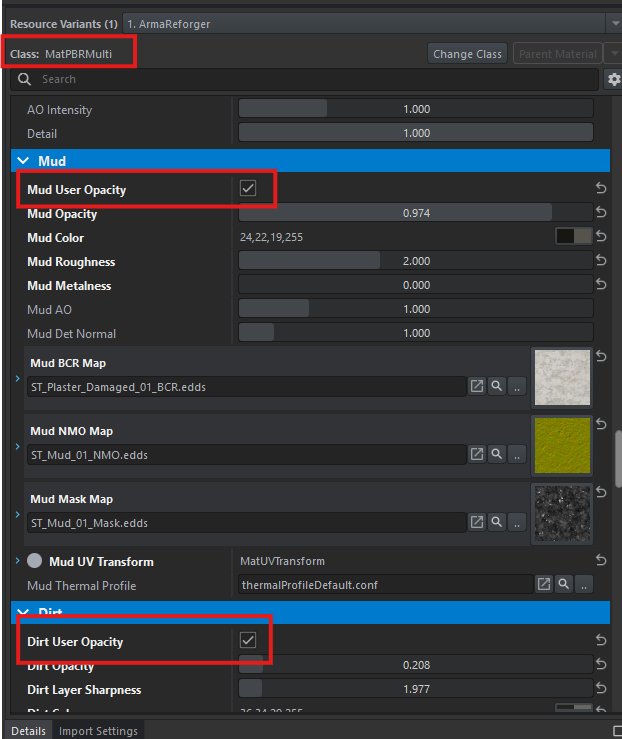
For dynamic dust and mud, a vehicle needs a ParametricMaterialInstanceComponent with User Param 1 (mud) and User Param 2 (dust) enabled. In the material (.emat) file, the Dirt User Opacity and Mud User Opacity options must also be enabled. These options are currently available only in MatPBRMulti materials.
Child components added through SlotManagerComponent, such as wheels, can also get dirty. Only immediate children are included.
SCR_WheelSlotInfo
The SCR_WheelSlotInfo implementation has moved from script to game code. It now inherits from WheelSlotInfo.
Game Material
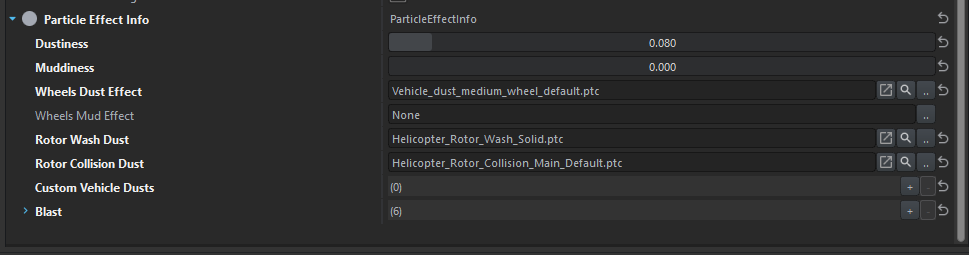
Particle Effect Info in game materials has changed to support the new features.
Dustiness and Muddiness
These factors determine how fast a vehicle accumulates dust and mud as it moves across a surface. VehicleWheelEffectComponent calculates the final values as follows:
Final dustiness =
(1 - wetness) * dustinessFinal muddiness =
wetness * muddiness
Standardized Vehicle Effects
Previously, all vehicle effects were defined arbitrarily in an array. They're now standardized into explicit entries: Wheel Dust Effect, Wheel Mud Effect, Rotor Wash Dust, and Rotor Collision Dust.
For backward compatibility, you can still reference vehicle effects by index, because the array is kept internally. However, we recommend the new VehicleDustEffectType enum, which references these effects explicitly.
For custom effects, use the array of custom vehicle dusts instead.
Wheels Mud Effect
To complement the dust effects, we added Wheels Mud Effect. The game uses it instead of the dust effect when the surface is wet.
Canteen / Hydration
A new realism feature. The less hydrated your character is, the heavier the penalty to stamina - no marathon runs unless you drink from your canteen.
Hydration is disabled by default and is currently enabled only in Campaign HQC. Scenario authors must explicitly opt in.
What this means for modders:
Custom / modded factions - review your loadouts and add a canteen where needed. Note that even some vanilla loadouts currently ship without one.
Custom scenarios - set hydration rules to match your design intent.
Mods with existing needs/survival systems - check for conflicts.
Where the logic lives:
SCR_CharacterStaminaComponent- hydration's effect on staminaSCR_EHydrationRules- the rules enumSCR_MissionHeader- mission-level overrideSCR_ConsumableFlaskEffect- canteen consumption behavior
Rules are read once at mission start and applied to all players.
Configuring the rules:
GameMode prefab: Unsorted → Hydration Rules
Mission header: Hydration Rules Override
The mission header takes priority. NO_OVERRIDE falls back to the GameMode setting.
Bonus: AI Spawning and Dormant Groups (changes since 1.8)
What Changed
The group entity is cheap and permanent. It stays in the world even when its soldiers are gone. A group without members is dormant.
One world queue spawns members one at a time. A whole group no longer spawns in a single frame, so there are no frame spikes. The previous throttling system on
AIGroupis removed.Groups remember their dead. A group that lost three members wakes up with three fewer. Killed members never come back.
Every group has an importance tier. It determines which group spawns first and which group is removed when the AI limit is reached.
A group's lifecycle runs CREATED (no members yet) → ACTIVE (members in the world) → DORMANT (members despawned, counts remembered) → GONE (deleted permanently). The entity is created once and stays. Only its members come and go.
Dormant Groups
A dormant group is one whose entity is alive but whose member characters are deleted. The group keeps two numbers: how many members were alive and how many died. When the group wakes up, it spawns only the alive count.
Despawned units lose their health state and inventory and always respawn fresh. This is deliberate, and it saves instantiation time.
Script API (on any AIGroup)
IsDormant() : Returns true when the group had members before and they're despawned now.
GetDormantAliveCount() : Returns how many members will come back. -1 means the group was never despawned.
GetDormantDeadCount() : Returns how many members were killed. These are never restored.
DespawnMembers() : Puts the group to sleep immediately (on SCR_AIGroup).
RequestSpawn() : Wakes the group up through the spawn queue.
Despawning isn't killing. A despawned member costs nothing and comes back later, but a dead member is permanently subtracted from the group. All of this state lives on the server and isn't replicated.
The Spawn Queue
All member spawning goes through a single queue in the AI world. Nothing spawns a full group in one frame anymore.
group.RequestSpawn(int slotsWanted = -1, float observerRange = 0)-1restores the previous size if the group was dormant. Otherwise, the group starts with one member and the queue fills it up.The queue spawns at most four members every half second across the whole world, so a group fills up over a few seconds.
Requests are served by importance: CRITICAL, then HIGH, NORMAL, and LOW.
If
observerRangeis greater than0, the request is dropped when no player is that close at spawn time.Groups that are below full strength and not dormant are topped up automatically, one member at a time.
Groups placed in the World Editor with Spawn Immediately selected also go through the queue.
When there's no room under the AI limit, HIGH and CRITICAL requests wait and retry, and LOW and NORMAL requests are dropped. A proximity-driven group simply asks again about a second later.
Eviction
When a request doesn't fit under the AI limit, the world tries to free room by despawning one group - putting it to sleep, not killing it. The selected group must meet all of these conditions:
Lower importance than the requester
Not dormant, with members in the world
Farther than 800 m from every player
Among the candidates, the world picks the lowest importance first and then the farthest away. If no candidate exists, HIGH and CRITICAL requests wait, and LOW and NORMAL requests are dropped.
Two useful consequences: a LOW group can never evict another group, and a group within 800 m of any player is safe from eviction.
Proximity Lifecycle
A group can manage itself. Set the policy once after you create the group, and then leave it alone:
group.SetLifecyclePolicy(SCR_EAIGroupLifecyclePolicy.ProximityDriven, 600, 800);About once per second, the group checks whether an observer - a player or a Game Master camera - is nearby.
When an observer is closer than the spawn distance (600 m by default), the group asks the queue for members.
When all observers are farther than the despawn distance (800 m by default), the members despawn and the group goes dormant.
The gap between 600 m and 800 m prevents groups from switching on and off repeatedly.
Pop-in guard: If a player approaches gradually and comes within 150 m, fresh members don't spawn in front of them.
SetEliminateWhenReached(true): If a player reaches the group position while the group has no members - for example, because the AI limit was full - the area counts as cleared and the group deletes itself. Ambient patrols use this setting.The default policy is Manual, so nothing changes for groups that you drive yourself with
SpawnMembersandDespawnMembers. For more control, seeSCR_EAIGroupLifecyclePolicy.
Note: Members that are still AI-activated - a driver, or a character with a permanent simulation LOD - keep the whole group active. The system never despawns units with a permanent LOD, and despawning waits until the LOD system deactivates them, which can happen beyond 1,000 m. If you need despawning at an exact distance, set DYNAMICSIM_LASTLOD_DISTANCE on your character prefabs to match.
The AI Limit
There's now only one AI limit that matters, and the default is 128. You can set it in two ways:
The CLI parameter
-activeAILimit XThe AIWorld property Active AI limit
AIWorld aiWorld = GetGame().GetAIWorld();
int limit = aiWorld.GetLimitOfActiveAIs();
int now = aiWorld.GetCurrentNumOfActiveAIs();
bool room = aiWorld.CanActivateGroup(null); // null = "is there room at all?"
Dormant groups don't count against the limit.
Unconscious characters do count, so the queue doesn't spawn replacements for them.
Game modes can also split the limit per faction.
Ambient Patrol Spawn Points
Ambient patrols are the clearest example of the new flow. The prefabs are Prefabs/Systems/AmbientPatrol/AmbientPatrolSpawnpoint_Base.et and the faction variants _US, _USSR, and _FIA. The logic lives in SCR_AmbientPatrolSpawnPointComponent.
Attribute
Description
m_eGroupType : Selects which group to take from the faction's entity catalog.
m_bPickRandomGroupType : Picks a random catalog group instead, weighted by probability.
m_iSpawnDistanceOverride : Sets the spawn distance for this point, in meters. -1 uses the system default.
m_iDespawnDistanceOverride : Sets the despawn distance for this point, in meters. -1 uses the system default.
m_eImportance : Sets the importance tier for the spawned group. The default is LOW.
When a player comes near and there's room under the AI limit, the system creates the group entity and sets it to ProximityDriven. From then on, the group runs itself. A patrol that's wiped out in combat doesn't come back, and a patrol whose empty spot a player reaches is retired permanently.
NOTE: While the AI limit is full, the spawn point is skipped before the group entity is created. Importance doesn't help at that stage, because eviction works only for groups that already exist.
Example: Spawn Your Own Patrol
The following example follows the same steps that the ambient patrol spawner uses. It's server-side only.
// Stop the group from auto-spawning members on init (one-shot flag).
SCR_AIGroup.IgnoreSpawning(true);

SCR_AIGroup group = SCR_AIGroup.Cast(GetGame().SpawnEntityPrefabEx(prefab, false, params: params));
if (!group)
return;

// Order matters: importance and policy first, then the spawn request.
group.SetImportance(SCR_EAISpawnImportance.NORMAL);
group.SetLifecyclePolicy(SCR_EAIGroupLifecyclePolicy.ProximityDriven, 600, 800);
group.SetEliminateWhenReached(true); // optional
group.AddWaypoint(waypoint);

// -1 = full size, gated on a player being within spawn distance.
group.RequestSpawn(-1, group.GetSpawnDistance());
Saves
Saved: The dormant alive and dead counts on the group, and the spawn point's eliminated flag.
Not saved: Importance, lifecycle policy, and spawn and despawn distances.
Whoever creates the group must set importance and the lifecycle policy again after a save is loaded. The vanilla spawners do this when they reconnect to their restored group. For the pattern, see SetspawnedGroup in SCR_AmbientPatrolSpawnPointComponen